
Customer Reviews With Photos
Love the grinder but if you don’t like strong coffee take 1/4 of coffee out of pod and try it. I made 10oz cup and it was strong but then I like weaker coffee. So far it works well. Instructions are not clear as to where the reusable filter cup is. See attached picture. Push on bottom of black area and it pops open. I just received this last week. Will update if problems. Also grinder has a picture of coffee beans inside against plastic. Take lid off to remove picture.
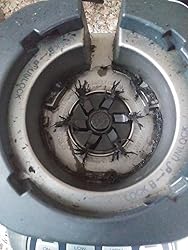
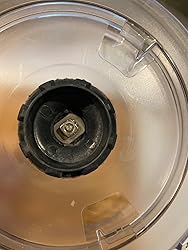
I broke the carafe on my 5 year old Black & Decker Mill & Brew workhorse and decided it was time to replace it. My first choice was to purchase the same model but unfortunately it is out of stock. I spent hours searching for a white Grind & Brew Coffee Maker and chose the Cuisinart DGB-850W 10-Cup Grind & Brew. My first picture shows it next to my old model. The design in my opinion is attractively sophisticated. I really like the clean look. It narrow taking up less counter space. It is taller than most machines so I had to make sure I had enough clearance. When in use I have to pull it forward which is not a problem for me. The stainless steel thermal carafe is also a positive feature for me. I usually transfer my coffee to a separate carafe. This allows me to save counter space. The opening of the carafe is too small to fit my petite hand in to clean. I compromise with a baby bottle brush. The instructions state that the hopper holds up to 1/2 pound of coffee beans. I used less -- only 1/4 pound of coffee beans. I followed the instructions carefully. The grounding process is very loud but I can live with that. The brewing time took a lot longer than my old B&D model --about 8 minutes. I can live with that too. Here is where I ran in difficulty. First time using it. I filled the reservoir careful not to exceed the water line. Poured my 1/4 pound of beans into the hopper. Set the cover properly. Set the grind settings and pushed the button to start the process. The grinder started and seemed to run a long time. Once completed the machine stopped. The brewing process would NOT start. Ultimately I reset the unit but this time turned off the grinder since this was already done. The brewing process was done in about 8 minutes. When I removed the carafe I noticed that grounds were on the top of the carafe, in the carafe housing, and around the hot plate. See the pictures. When I opened the ground basket housing I found grounds on top of the basket lid and on the door hinge housing. The picture of this was taken after I had cleaned some of the grinds away. This is very difficult to clean since the door cannot be removed. I had to use a butter knife wrapped with a thin layer of paper towel to remove all of the grounds. The clean up process took me 15-20 minutes. I really wanted this to work for me and was not ready to give up. I re-read the material to eliminate human error. I made sure the basket handle was facing the correct direction. Second attempt. The machine would not start the grind process. Instead it gave me an "Empty" error. I opened an closed every component. Yes the water tank was filled to the 10 Cup line. I checked for residue as well. I powered it off and then on after 5 minutes. The machine cycled from grind to brew! I has hopeful. Unfortunately the grounds were on the top of the carafe, the upper and back of carafe housing. When I opened the coffee basket housing, I found coffee grounds on top the basket cover and on the door hinge. Again it was mess to clean. The last 2 pictures were after I had already started clean up. I really wanted this machine to work for me. So I gave it a third try. It was another messy clean up. I admitted defeat and returned it. What a disappointment. A few suggestions to the manufacturer. Make it so the door hinge is removable for clean up. Re-evaluate the coffee basket lid. The grinds should transfer directly into the basket and nowhere else. I would really like to hear from others who had similar challenges and how they overcame them.
Not quite deep enough for my taste but works really well.

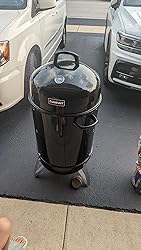
My wife got me this smoker for Father's day. I was about concerned as my preference was not use a bullet style smoker but more of a barrel style. Knowing this my first smoker, and as a novice pitmaster ..lol getting into the smoking game. This is a perfect starter smoker to start out with. I started out with smoking a 4.5lbs brisket, and it turned out amazing. Few things I noticed... Assembly: This will take at least an hour to assemble and put together. For some reason the one I received , was not brand new. The box was damaged, and it appeared it was return by another customer (unused) as some parts were assembled, and the screws were taped up. I noticed the lid had a small dent on it after I assembled the smoker. Not a huge deal breaker but not satisfied that I didn't get a brand new Smoker Quality: Starting out it appears the temperature gauge on the lid was not accurate or reliable. I would recommend getting a meat thermometer to check temperatures of the meat you are smoking. The gauge on the smoker would not read temps above 215°F. I'm planning to do a tear down later this week to see how everything held up after the smoke test. I used a charcoal and wood splits (Hickory). The grates on the grill are subpar, but held up. I read other reviews where the had concerns with the grates, paint bubbling.
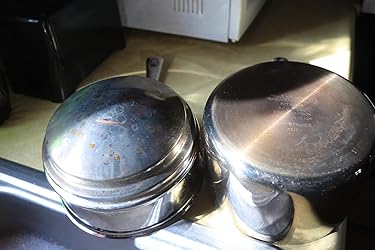
Cuisinart FCT1113-18 French Classic Tri-Ply Stainless 3-Piece Saucepan and Double Boiler Set I've used this double boiler about 5 times now since purchasing it a few weeks ago. I liked how it's heavy steel but now the bottom of each of the pans is dark-colored and spotty. I used it on low to medium heat, avoiding high heat as was directed but it still stained. Not happy about it at all!! Any tips on how to get it back to new condition?
Bought a set of the same last year and haven’t been able to find it anywhere until I came across them here on cuisinartoutlets.com. They’re as beautiful and functional as always. After using the same for a year, I can safely say they don’t rust or stain. They’re 100% dishwasher safe. Love them and highly recommend!
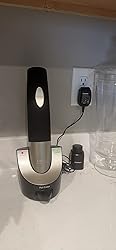
It’s easy to grip and ergonomically comfortable when using. I like that it has the foil cutter included. It sits on my counter out of the way, on its charger base. It looks great and coordinates well with my stainless steel appliances. Recently I have unplugged the charger from the outlet because I knew I wouldn’t have company for a while. But when I did have company it was fully charged and ready to go. This makes bottle opening so easy. I can’t believe I waited so long to go electric.
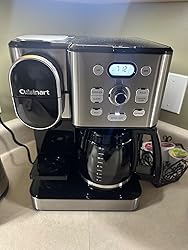
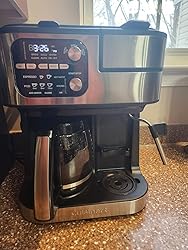
I have read a lot of negative reviews on this coffee pot, but after reading how people got past the Kcup single serve issue by calling support, I figured I’d give it a shot. I absolutely love this and sooo glad I got it despite the reviews. I did have an initial issue with the single serve side but somehow I got thru it without having to call support. Other than that I have had no issues so far. It’s been a week. It’s very nice quality and coffee tastes great! I have been wanting to go back to fresh grounds and brewing a whole pot and get away from K cups bc of cost and waste!! I am so glad I made the move. I especially love the lift handle on the single side water reservoir!!! That was such a smart move to make that! We enjoy a whole pot of coffee in the mornings and the convenience of a “afternoon wake up” cup by using the single serve side. We can use fresh grounds or kcups if we’re in a pinch. I love how nice and clean this machine looks on my counter. If you’re hesitant I would say get it. You may not have a bad experience like the others and end up being glad you got it….like I did!!! 🙌🏼👌🏽
Bad for smoothies. Air pockets are created every few seconds keeping fruits from getting liquified. The lid is not air tight and liquid is pushed out and leaks from the top. The machine broke after just a few months of usage. They replaced the machine but not after making a fuss about it. Weeks after I received the new part it broke again. Do not buy this blender if you actually plan on using it regularly because it is nothing short of a decent looking piece of junk.
Muy bueno y fácil de usar

I don't know if I was pulsing too much while prepping broccoli fritters, but it stopped working after 6 months. I was so excited to get it because of the great reviews and historically great brand quality, but for sure, I will have to go to plan B. The issue is that the motor works but the blade doesn't spin because the metal washer in the underside of the bowl isn't grabbing the plastic that houses it. Thus, the blades aren't spinning. Long-term wear and tear would be a great concern of mine with this machine. I loved it while it lasted!
The product states it is dishwasher safe and stainless steel, however this tray rusted after one run through the dishwasher. Customer service according to cuisinartoutlets.com had to be done through Cuisinart to which they stated no refunds or replacements even for this.
I've had this smoker for about 2 weeks, and I've used it 5-6 times now. First off, like others have said, the temp gauge is completely useless. You should really invest in a good probe if you get this smoker. The charcoal ring is pretty thin and bendable, but it is not flimsy. The cooking grates are actually about 16½ inches in diameter. The overall outside diameter is 18 inches, so if you are planning on smoking a full rack of ribs, you will have to trim it a bit. Following the manufacturers instuctions, maintaining temps around 250°F is incredibly easy at sea level, ±25°. The charcoal chamber is small, which requires reloading after about an hour & a half or so. The overall construction and fit & finish is to be expected at this price range, but the material is decently thick. You will need approximately 45 minutes, a few metric sockets, and a philips head screwdriver to assemble it. A pair of channel locks won't hurt either.

I know this is mid-range in cost, but I expect more. Starting with what I see as design flaws. It is very hard tell if there is coffee already made in the carafe. (see photos). The water reservoir is in the rear of the coffeemaker which makes it difficult to be able to empty a full carafe of water into the reservoir for drip coffee. To add water for espresso or k-cup serving the water reservoir is in the back of the machine so you must pull it out from the wall to access the reservoir. There is no way to turn the machine off once coffee is made and the carafe is emptied. Not until it reaches its full warming cycle and then it automatically shuts off. This seems like it could cause carafes to burn or scorch as they are left on warming plate empty. The temperature of the coffee is not very hot, and cools down far too fast (cools down to barely lukewarm after a few sips) which says it wasnt very hot to start. Finally the motor on the espresso part of coffeemaker is unbelievably loud when making espresso. (listen to video) I kept it for a week and tried to like it or get used to it, but it only frustrates me. So I am now back to the drawing board to find a decent coffee/k-cup/espresso maker :-( Right now to have a coffeemaker that combines drip coffee, espresso and k-cups it appears that there are only two choices on the market at this time, this one and the Ninja.
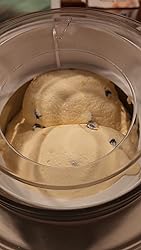
I never thought I would have an ice cream maker. Once I switched to a keto carnivore diet, I had to seriously raise the amount of fat in my diet. It's hard getting 75% calories every day from fat, so ice cream seemed perfect. Since I am carb-free, making it myself was a no-brainer. This machine is not as loud as other reviewers have mentioned. It isn't bothersome at all from the other room. You can hear it in my video. I froze my tub for a full 24 hours before making my first batch, and I also made sure my mix was chilled for several hours in the fridge before starting. The whole process took about 20 minutes once I flipped the switch. If you make a full batch, you'll end up with 30 oz or 1.875 pints. I split it into 3 containers. I'll share my recipe so you have an idea of how much liquid it will hold (a little over 4 cups). It's a frozen custard because of the eggs. Leave them out, and it's ice cream. Combine: - 2 cups heavy cream - 3 tbsp butter - 1/3 cup allulose / monk fruit sweetener blend Reduce by 50% over med low heat in wide pan until condensed milk consistency (about 25 minutes). Stir constantly. Temper 3 egg yolks, then add to pan. Stir until mixed well, and heat for several minutes. Remove from heat, and then chill. Add: - 1 cup heavy cream - 1 cup milk or almond milk - 2 tsp vanilla (or flavor as you prefer) Whisk mixture. Chill 20 minutes or until ready to mix. Add to your new mixer, mix for about 20 minutes, and then ENJOY! It's a soft ice cream at this point. Freeze in containers if you prefer hard ice cream instead. The allulose/ monk fruit blend is extremely important if you aren't using regular sugar. It's the only sweetener that freezes like normal sugar. If you use anything else, your ice cream will freeze into blocks of solid ice. With this sweetener, the hard ice cream is just like the store bought stuff and has great texture! Btw, this was my first time making frozen custard, so you'll see some egg chunks in there. Haha. It's just for me, so I didn't care. Don't forget to temper the eggs before you add them to the heat!